Automating PGP Key Issuance and Distribution with GPG and 1Password

SKILL LEVEL: Advanced.
In this article, we will be implementing one approach to centralize PGP key issuing and distribution for an organization. We'll use an existing Linux instance's GnuPG tool to issue and manage keys. To distribute keys to users, we'll use the 1Password CLI. Let's dive in!
The Infrastructure
We're using a stripped down Debian 12 "Bookworm" instance running at a cloud service provider. The instance is isolated from external network traffic and requires Cloudflare WARP to connect. SSH is enabled on the Virtual Private Server (VPS) and requires certificate authentication along with password and a Two-Factor OTP.
Packages needed
Depending on your VPS, some of these may be needed while others may already be installed.
- openssh-server - SSH access
- libpam-google-authenticator - 2FA OTP
- nano - Text editor
- sudo - To execute commands with elevated priviledges
- gnupg - To manage PGP keys
- curl - To download files (needed for 1Password Setup)
- 1password-cli - Linux version of 1Passwords Command Line Interface (CLI)
- jq - To parse JSON
Install needed packages
Let's get started by installing the needed packages except for the 1Password-CLI. You'll need to be logged in as root OR have sudo installed already.
sudo apt install -y openssh-server libpam-google-authenticator nano gnupg curl
Now, let's install the 1Password-CLI.
Source: https://developer.1password.com/docs/cli/get-started
Add the key for the 1Password apt repository:
curl -sS https://downloads.1password.com/linux/keys/1password.asc | \
 sudo gpg --dearmor --output /usr/share/keyrings/1password-archive-keyring.gpg
Add the 1Password apt repository:
echo "deb [arch=$(dpkg --print-architecture) signed-by=/usr/share/keyrings/1password-archive-keyring.gpg] https://downloads.1password.com/linux/debian/$(dpkg --print-architecture) stable main" |
 sudo tee /etc/apt/sources.list.d/1password.list
Add the debsig-verify policy:
sudo mkdir -p /etc/debsig/policies/AC2D62742012EA22/
curl -sS https://downloads.1password.com/linux/debian/debsig/1password.pol | \
 sudo tee /etc/debsig/policies/AC2D62742012EA22/1password.pol
sudo mkdir -p /usr/share/debsig/keyrings/AC2D62742012EA22
curl -sS https://downloads.1password.com/linux/keys/1password.asc | \
 sudo gpg --dearmor --output /usr/share/debsig/keyrings/AC2D62742012EA22/debsig.gpg
Install 1Password CLI:
sudo apt update && sudo apt install 1password-cli
Check that 1Password CLI installed successfully:
op --version
Configure 1Password with a Service Account
Create a service account
Source: https://developer.1password.com/docs/service-accounts/get-started/
- Sign in to your account on 1Password.com.
- Click Integrations in the sidebar. If you already have active integrations, click Directory at the top of the Integrations page.
- Under Infrastructure Secrets Management, click Other.
- Click Create a Service Account and follow the onscreen instructions:
- Choose a name for the service account.
- Select whether or not the service account can create vaults.
- Select the vaults the service account can access, then click the settings icon to select the permissions it has in each vault.
- Click Save in 1Password to save the service account token in your 1Password account. In the next window, enter a name for the item and choose a vault to save it in.
Note that after creating a service account, you can't edit its ability to create vaults or the permissions it has for vaults it can access.
Set ENV Variable with Token
Enter the following at the command line:
export OP_SERVICE_ACCOUNT_TOKEN=<your-service-account-token>
Test that it worked.
op user get --me
The Automation
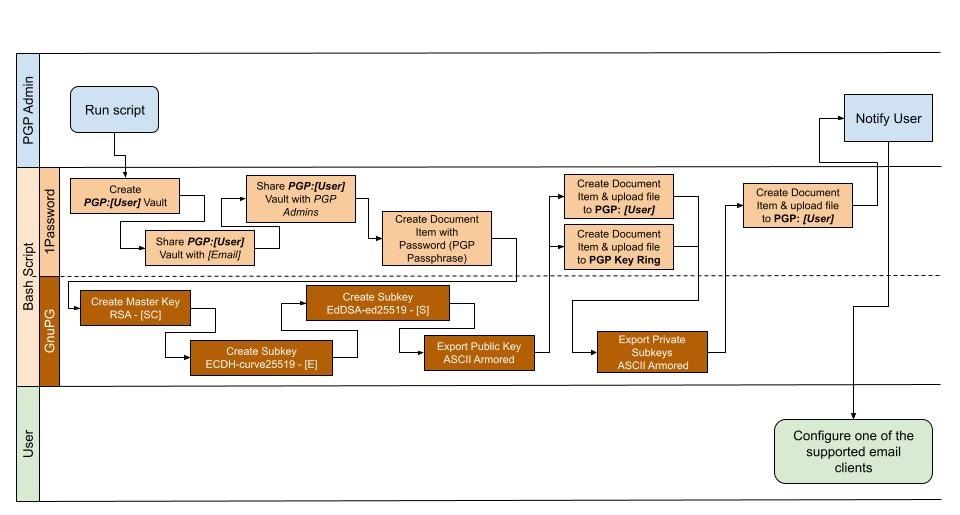
Generally, the next part will do the following:
- Create a 1Password Vault and share it with the user.
- Create a 1Password item for the PGP Passphrase.
- Create new PGP Master Key
- Create new PGP Sub-Keys for encryption and signing
- Export the public key and upload it to the user's vault and a company-wide key ring.
- Export the private key and upload it to the user's vault.
Creating the script
Enter your favorite text editor.
nano issueKey.sh
Copy/paste the below BASH script.
#!/usr/bin/env bash
# This script will create the needed 1Password Vaults, issue PGP certs/sub-keys, and upload
# to the correct 1Password Vaults.
#
# SYNTAX: ./issueKey [Full Name] [email address]
#
H1='\e[30;48;5;88m'
C='\e[1;36m'
NC='\e[0m'
vaultPrefix='PGP:'
vaultDesc='These are your keys! Safeguard the private key and share the public key.'
vaultIcon='id-card'
keyValid=0
pubKeyFilename='key-PUBLIC.gpg'
pubKeyTitle='Your PUBLIC Key'
privKeyFilename='key-PRIVATE.gpg'
privKeyTitle='Your PRIVATE Key'
companyVault='PGP Key Ring'

echo ""
echo -e "${H1}Starting new user key issuing.  Please Wait.${NC}"
echo ""

# Create the vault based on parameters provided
echo -e "${C}Creating a new vault named ${vaultPrefix}${1}...${NC}"
op vault create "$vaultPrefix$1" --description "$vaultDesc" --icon "$vaultIcon"

# Share the vaule with the email address provided and the admin
echo -e "${C}Sharing vault ${vaultPrefix}${1} with ${2}...${NC}"
op vault user grant --vault "$vaultPrefix$1" --user "$2" --permissions allow_viewing
echo -e "${C}Sharing vault ${vaultPrefix}${1} with PGPAdmins Group...${NC}"
op vault group grant --vault "$vaultPrefix$1" --group "PGP Admins" --permissions manage_vault

# Create the item in 1Password for the PGP Passphrase.  Generate random password and store in variable
echo -e "${C}Creating PGP Passphrase in the ${vaultPrefix}${1} vault...${NC}"
resp=$(op item create --category PASSWORD --format json --vault "$vaultPrefix$1" --title "Your PGP Passphrase" --generate-password)
pass=$(echo $resp | jq -r .fields[0].value)

# Create the master key and an encryption subkey.
echo -e "${C}Creating the PGP Master Key and encryption subkey...${NC}"
cat >key-details <<EOF
   Key-Type: default
   Subkey-Type: ecc
   Subkey-Curve: cv25519
   Subkey-Usage: encrypt
   Name-Real: ${1}
   Name-Email: ${2}
   Passphrase: ${pass}
   Expire-Date: ${keyValid}
EOF
gpg --batch --generate-key key-details
rm key-details

# Get the first "fpr" or "fp2" key Id to use for subkey creation
x=$(gpg --list-secret-keys --with-colons $2 | awk -F: '$1 == "fpr" || $1 == "fp2" {print $10}')
ids=($x)
keyId=${ids[0]}

# Create the signing subkey
echo -e "${C}Creating the signing subkey...${NC}"
gpg --command-fd 0 --pinentry-mode loopback \
    --quick-add-key ${keyId} ed25519 <<END
${pass}
END

# Export public key and upload to 1Password Vault
echo -e "${C}Exporting public key for $keyId...${NC}"
gpg --output $pubKeyFilename --armour --export $keyId
echo -e "${C}Uploading $pubKeyFilename to $vaultPrefix$1 vault...${NC}"
op document create $pubKeyFilename --vault "$vaultPrefix$1" --title "$pubKeyTitle"
echo -e "${C}Uploading $pubKeyFilename to Company Public Key vault...${NC}"
op document create $pubKeyFilename --file-name "$2-Public" --vault "$companyVault" --title "$2 Public Key"
rm $pubKeyFilename

# Export Secret Subkeys and upload to 1Password Vault
gpg --command-fd 0 --pinentry-mode loopback \
    --output $privKeyFilename --armor --export-secret-subkeys $keyId <<END
${pass}
END
echo -e "${C}Uploading $privKeyFilename to $vaultPrefix$1 vault...${NC}"
op document create $privKeyFilename --vault "$vaultPrefix$1" --title "$privKeyTitle"
rm $privKeyFilename
Need more help?
KilPen Technical Services can help you with your project! Contact Us and we'll get right back to you.
Give a kudos
Did you find this article helpful? If so, please consider signing up and leaving a comment.
You can also: